

I have spent 6 months last year on e-commerce implementation using Sitecore Commerce 8.2.1 Update 2. Long story short – that version was like chimera. It was already not Commerce Server anymore (as we knew it until Sitecore Commerce 8.2) but also still not Sitecore Experience Commerce 9.
I was in early adopters program for Commerce 9 and eagerly waiting for official release.
Installation of Commerce 9 is really easy if I compare it with previous version Sitecore Commerce 8.2.1. This was definitely eased by using Sitecore Installation Framework (SIF).
Let’s get started!
1)
Braintree sandbox account
You need a Braintree sandbox account to enable web payment functionality through the Commerce Engine. Follow the instructions on the Braintree website to set up an account, and note the MerchantID, Public Key and Private Key information. You need to specify the values for those parameters in the Sitecore XC deployment script.
2)
Installing prerequisites
– Create “C:\deploy” folder on your machine. You can use your preferred location but adjust below configuration and paths accordingly!
– To run Sitecore Experience Commerce 9 (SXC9) you need to have instance of Sitecore 9.0.1 (Sitecore 9 Update 1) up and running.
If you haven’t done that so far (what a shame :-)), follow my series of blog posts to help you out. For Commerce 9 Installation purposes please create Sitecore instance with prefix “sxc9” or choose your own name /prefix.
If you choose your own or you already have one, change configuration and names below according to your setup.
– Download and Install .NET Core 2.0 – I have downloaded .NET Core 2.1.4 SDK from this link.
– Download and Install .NET Core Windows Server Hosting 2.0.0 – I have downloaded it from this link.
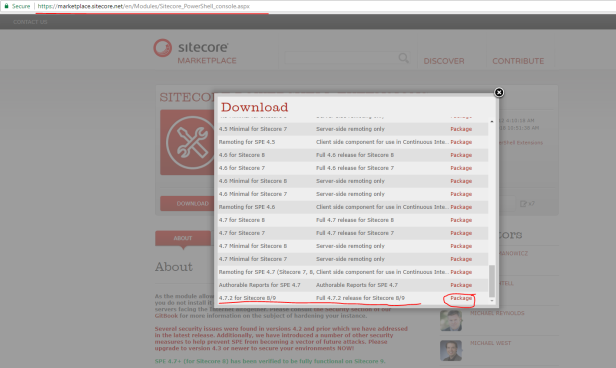
– Download Sitecore Powershell Extensions 4.7.2 from Sitecore Marketplace. Do not install package now!
Copy downloaded file into folder “C:\deploy\assets”.
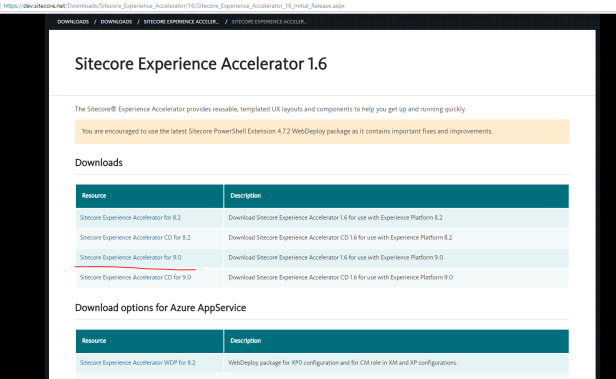
– Download Sitecore Experience Accelerator 1.6 from its download site or from this direct link. Do not install package now!
Copy downloaded file into folder “C:\deploy\assets”.
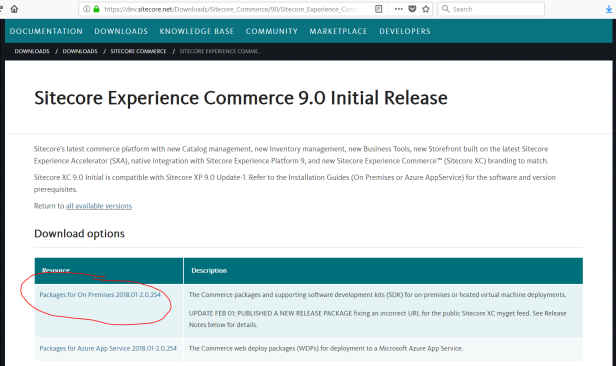
– Download the Sitecore XC release package and prerequisites from it’s download site or from this direct link.
Copy downloaded zip file into folder “C:\deploy\”.
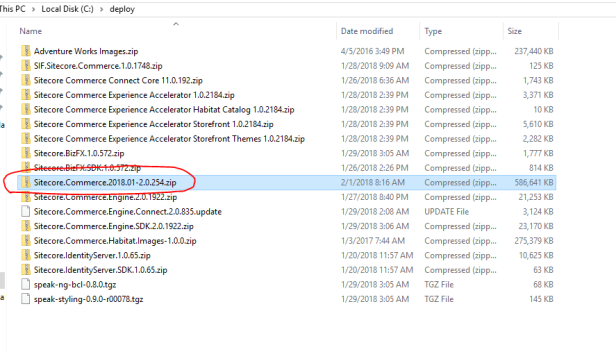
– Extract the content of the zip file onto the environment from which you are going to deploy Sitecore XC. In my case I have extracted zip file “C:\deploy\Sitecore.Commerce.2018.01-2.0.254.zip” directly into “C:\deploy”
The extraction process results in multiple .zip files in folder “C:\deploy”.
Remove “Sitecore.Commerce.2018.01-2.0.254.zip” file from folder “C:\deploy” as it is no longer needed.
– Go to the folder where you extracted the zip files (in my case, c:\deploy)
and unzip the following files:
- SIF.Sitecore.Commerce.1.0.1748.zip
- Sitecore.Commerce.Engine.SDK.2.0.1922.zip
- Sitecore.BizFX.1.0.572.zip
Make a note of the destination folders. You must specify the path to their locations in the Sitecore XC deployment script. Leave all other files in the release package zipped. If you are following this post, you don’t need to mark paths of files as in my deployment script in the end, all is set properly.
For me paths to those folders where:
C:\deploy\SIF.Sitecore.Commerce.1.0.1748
C:\deploy\Sitecore.BizFX.1.0.572
C:\deploy\Sitecore.Commerce.Engine.SDK.2.0.1922
Remove “SIF.Sitecore.Commerce.1.0.1748.zip”, “Sitecore.BizFX.1.0.572.zip” and “Sitecore.Commerce.Engine.SDK.2.0.1922.zip” files from folder “C:\deploy” as they are no longer needed.
– Download MSBuild Microsoft Visual Studio Web targets from nuget
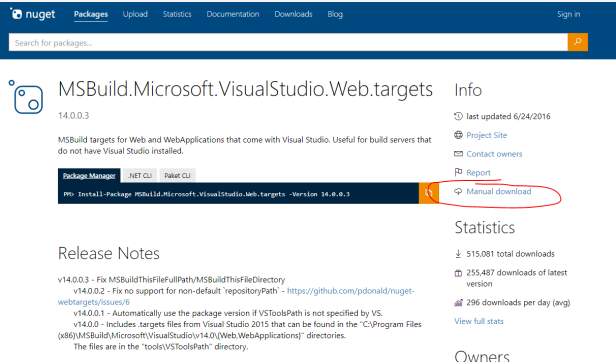
Change extension of downloaded file from “nupkg” to “zip” and extract file “Microsoft.Web.XmlTransform.dll” from path \tools\VSToolsPath\Web in that zip file.
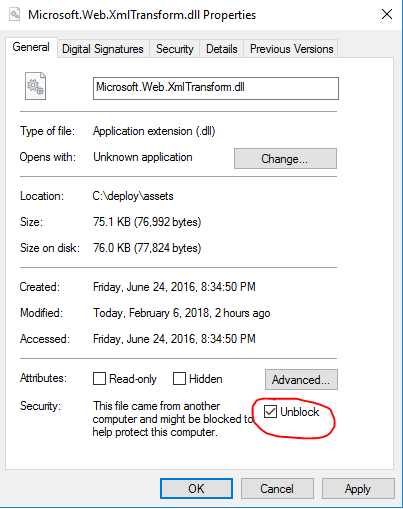
Copy “Microsoft.Web.XmlTransform.dll” file into “c:\deploy\assets”.
Don’t forget to unblock this file!
– Copy file “Sitecore.Commerce.Engine.DB.dacpac” from “C:\deploy\Sitecore.Commerce.Engine.SDK.2.0.1922” into “C:\deploy\assets”
3)
Create a certificate for Sitecore Commerce Engine Connect
You must create a certificate for the Sitecore Commerce Engine Connect to authenticate with the Sitecore XC Engine.
To do so:
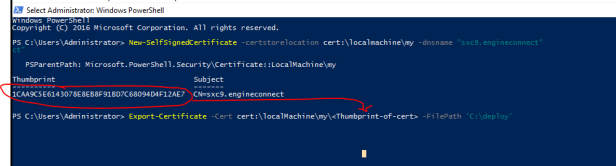
- Launch PowerShell as an administrator.
- Create the certificate by running the following cmdlet:
New-SelfSignedCertificate -certstorelocation cert:\localmachine\my -dnsname “sxc9.engineconnect”
and mark down generated Thumbprint.
- Export the certificate to a file by running the following cmdlet:
Export-Certificate -Cert cert:\localMachine\my\ {Thumbprint} -FilePath ‘C:\deploy\assets\EngineConnect.crt’
Instead of {Thumbprint}, place your certificate thumbprint from 2. step
e.g.
Export-Certificate -Cert cert:\localMachine\my\ 1CAA9C5E6143078E8EB8F91BD7C68094D4F12AE7 -FilePath ‘C:\deploy\assets\EngineConnect.crt’
4)
Stop xConnect service through IIS Manager
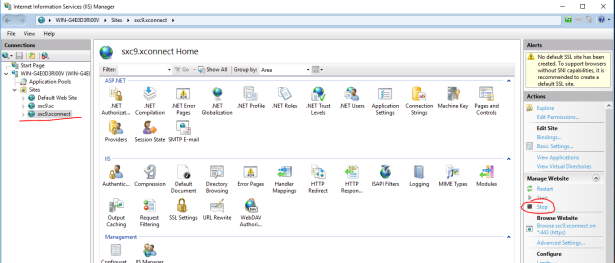
You should see this:
5)
Verify deploy folder
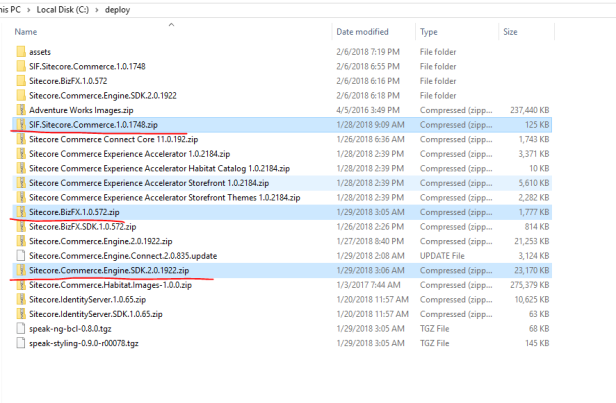
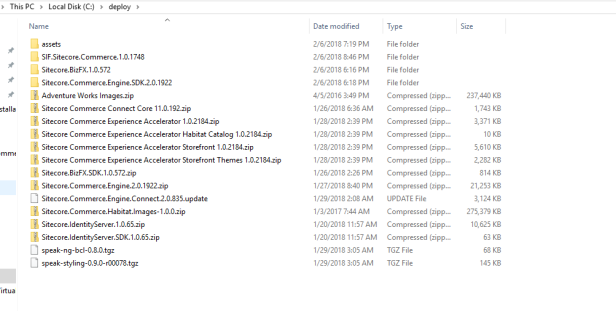
Before proceeding with installation, let’s verify file listing of deploy folders.
File listing for “C:\deploy” folder:
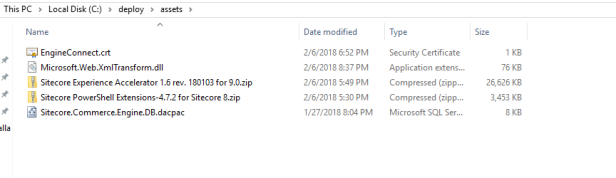
File listing for “C:\deploy\assets” folder:
6)
Running deploy script
Use my deployment script which is customized to names and paths used in this blog post. So if you followed me or just want to really quickly get valid deployment script, grab Powershell script from here.
With “valid” deployment script in previous chapter, I actually meant working.
In chapter 3.2 Customize the deployment script in Installation Guide (link in the bottom of the post), there are instructions to create your own deployment script.
I would not recommend using this file as it has small typos in it and deployment script would give you exceptions mentioned in “Troubleshooting Sitecore Experience Commerce 9 Installation” article wrote by Kautilya Prasad – link is at the end of this post.
Download and use mine script nevertheless whether you have followed me or not.
Just open it, adjust variables to suit your configuration and run.
Copy the ps1 file into c:/deploy/SIF.Sitecore.Commerce.1.0.1748 folder or folder where you have extracted SIF zip file in previous steps.
Run it using PowerShell.
After couple of minutes everything is finished.
At this point, I have received exception that solr cores could not be reindexed.
I have done it manually later on without any problem from Sitecore Control Panel.
7)
Post Installation steps
– Run Sitecore and SXA Storefront
Ensure that xConnect site is still stopped through IIS Manager:
Open browser and:
- in one tab navigate to Sitecore Launchpad – https:///sitecore – in my case http://sxc9.sc/sitecore/
- in another tab navigate to SXA Storefront – https://sxa.storefront.com
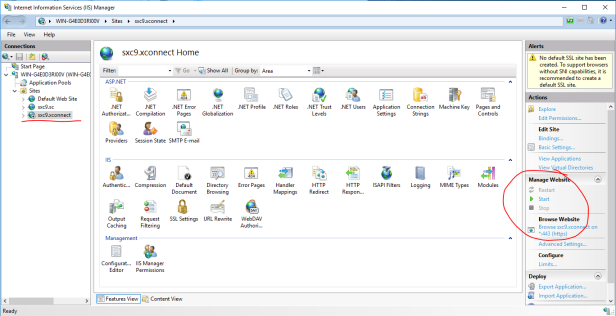
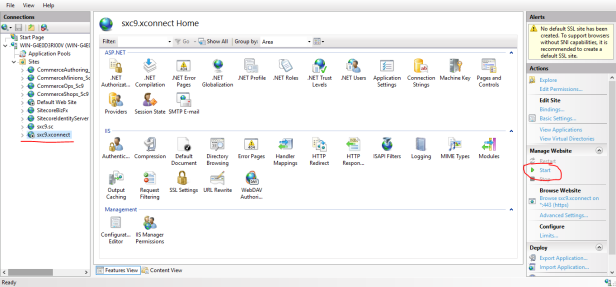
– Start xConnect
After the sites have loaded, on your Windows server, open the IIS Manager.
Navigate to the .xconnect site – for me it was sxc9.xconnect.
In the right pane, under Manage Website, click “Start”.
– Finish all remaining post-installation steps
Follow chapters 4.2 and 4.3 from Installation Guide (link in the bottom of this post) – if you are using default Sitecore credentials to log in and do not wish to create users in Sitecore, you can skip these chapters for now.
8)
Verify installation
Open Sitecore Launchpad and you should see new “Business Tools” application:
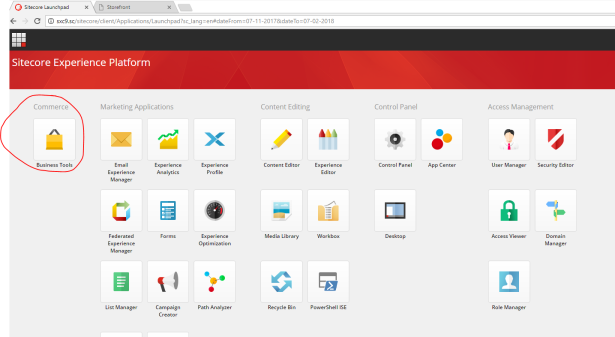
If you click on it, it will open new tab with Sitecore Commerce Business Tools:
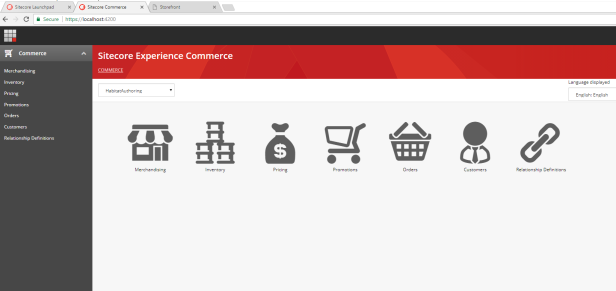
You need to log in with your admin credentials or with user that has “Commerce Business User” role assigned, at minimum.
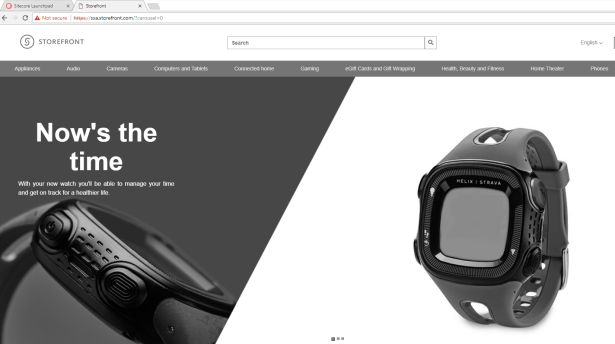
You can also verify SXA Storefront:
Looking forward using and developing for this platform soon.
Cheers.
——————————————————
Useful links:
- Troubleshooting Sitecore Experience Commerce 9 Installation by Kautilya Prasad
- Really good overview of changes in Sitecore Commerce 9 by Christian Hahn
- SIFLess Uninstall with Sitecore Experience Commerce 9 by
——————————————————
Used sources:
