I have described and done installation of Initial Release of Sitecore Experience Commerce (SXC) 9.0 in my previous blog post.

Some weeks have passed since and Sitecore released Update 1 with couple of fixed and enhancements. You can see most visible corrective content included in this update in release notes.

I was following official Sitecore upgrade instructions. Link can be found at the end of this article. There were couple of things which description was not so wide. This article will help you out to fill out some gaps.

Before starting with any other tasks, you need to download installation package for SXC 9 Update 1. There is no dedicated upgrade package!

Installation package for SXC 9 Update 1 can be found here.

You need to choose appropriate package based on your installation. I have chosen “Packages for On Premises” as my installation was on premise.

sxcupgrade00

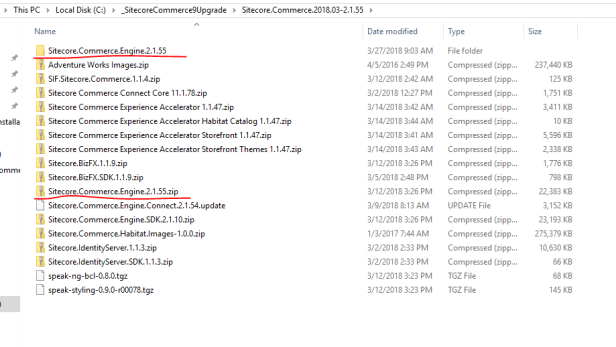
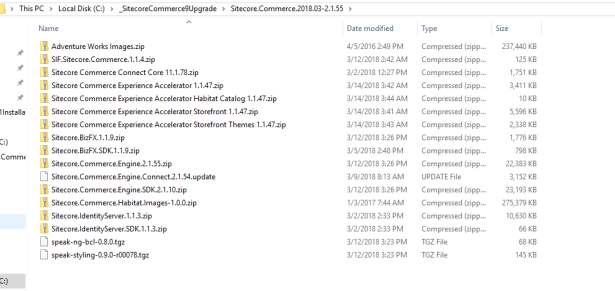
When download finishes, unpack downloaded zip file:
sxcupgrade00b

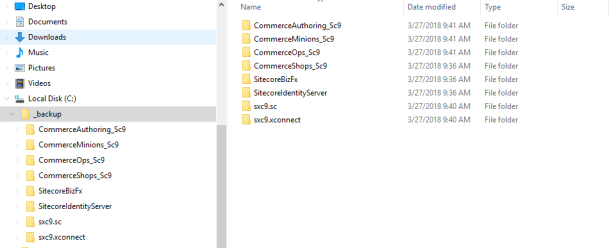
I have also made a backup of all sites before proceeding with upgrade, just to have old files if they are needed in the future:
sxcupgrade00

Now it is time to do upgrade as all preparations are done 🙂

As per upgrade instructions, I’ve done upgrade in four steps:

  1. Upgrade Commerce Engine, Commerce Connect Core, Commerce Engine Connect
  2. Upgrade BizFx
  3. Upgrading Identity Server
  4. Deploying Storefront


Step 1: Upgrade Commerce Engine, Commerce Connect Core, Commerce Engine Connect

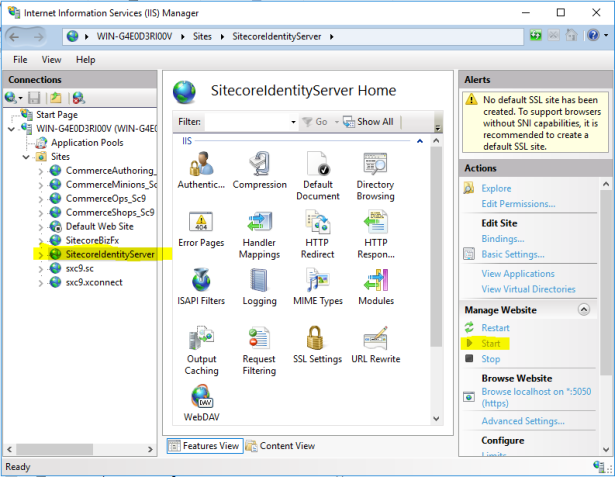
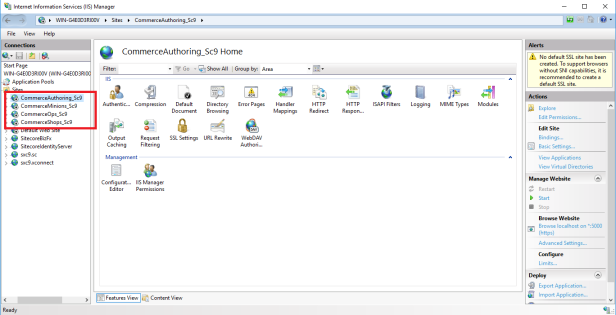
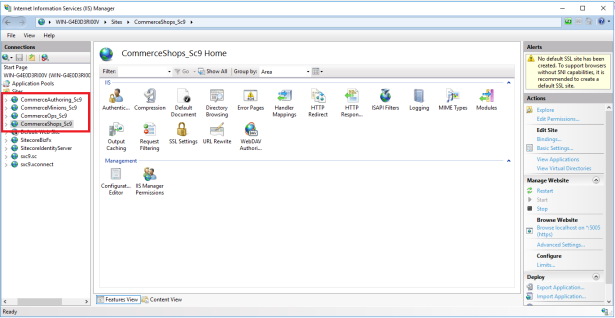
1a) Stop all 4 Commerce Engine sites:
  • CommerceAuthoring_Sc9
  • CommerceMinions_Sc9
  • CommerceOps_Sc9
  • CommerceShops_Sc9

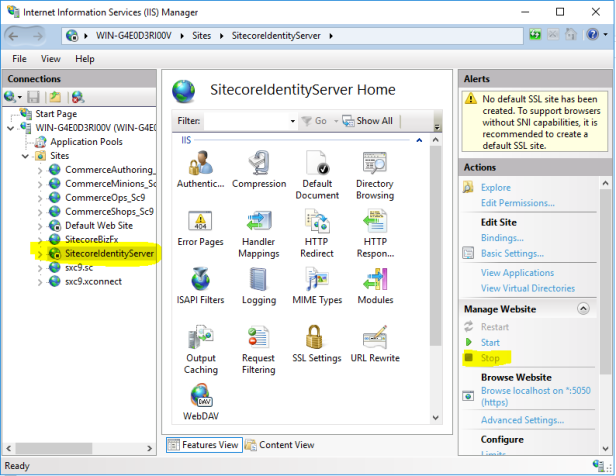
In IIS, stop all sites.
sxcupgrade01

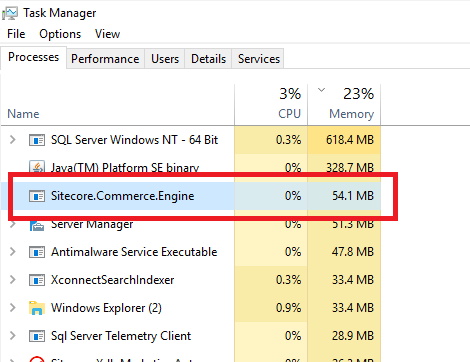
You also need to stop “Sitecore.Commerce.Engine” process through Task Manager in order to accomplish next step. This is not mentioned in Upgrade instructions!

If you don’t do this, you won’t be able to replace files in CommerceMinions_Sc9 site in next step!
sxcupgrade01b


1b) Replace all files in each Engine service parent folder only with the 9.0 Update-1 versions, each of:

  • CommerceAuthoring_SC9
  • CommerceShops_SC9
  • CommerceMinions_SC9
  • CommerceOps_SC9
Perform this using the Sitecore.Commerce.Engine.2.1.55.zip package.
Unpack it:
sxcupgrade02
Navigate to “wwwroot” subfolder and remove these items:
  • “data” folder
  • “config.Development.json” file
  • “config.json” file

“wwwroot ” folder should look like this at the end:

sxcupgrade04

Copy into clipboard whole adjusted Sitecore.Commerce.Engine.2.. folder.

Paste it into respective c:\inetpub\wwwroot subfolder for each site replacing exiting content of those folders:

  • CommerceAuthoring_SC9 -> c:\inetpub\wwwroot\CommerceAuthoring_SC9
  • CommerceShops_SC9 -> c:\inetpub\wwwroot\CommerceShops_SC9
  • CommerceMinions_SC9 -> c:\inetpub\wwwroot\CommerceMinions_SC9
  • CommerceOps_SC9 -> c:\inetpub\wwwroot\CommerceOps_SC9
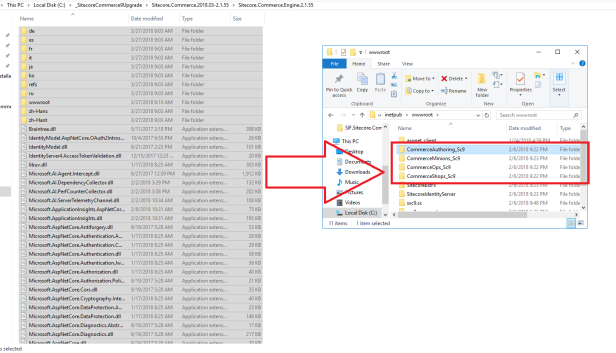
sxcupgrade05

1c) Manually change environment files

First you need to copy and paste the “PlugIn.CatalogIndexing.PolicySet-1.0.0.json” – new policy set.
You can find it in package “Sitecore.Commerce.Engine.2.1.55.zip”. Open it and navigate to “\wwwroot\data\Environments”. Copy “PlugIn.CatalogIndexing.PolicySet-1.0.0.json” into all Commerce Engine Service sites:
  • CommerceAuthoring_SC9 -> c:\inetpub\wwwroot\CommerceAuthoring_SC9\wwwroot\data\Environments
  • CommerceShops_SC9 -> c:\inetpub\wwwroot\CommerceShops_SC9\wwwroot\data\Environments
  • CommerceMinions_SC9 -> c:\inetpub\wwwroot\CommerceMinions_SC9\wwwroot\data\Environments
  • CommerceOps_SC9 -> c:\inetpub\wwwroot\CommerceOps_SC9\wwwroot\data\Environments
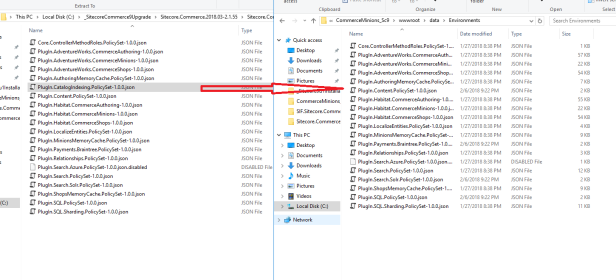
sxcupgrade06
Second, manually edit in a json or text editor:
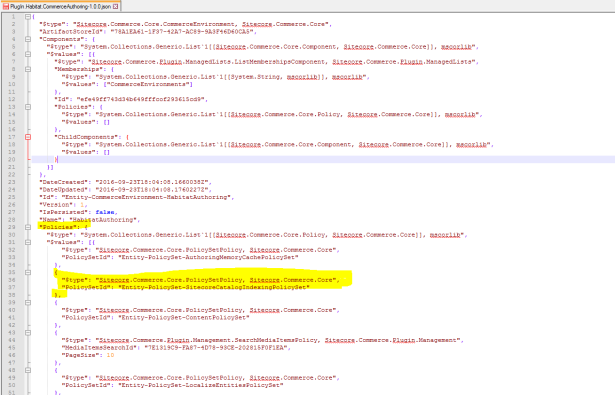
– Add the following policy to the policy collection for all Authoring and Shops environments, e.g:
Plugin.Habitat.CommerceAuthoring-*.json
Plugin.Habitat.CommerceShops-*.json
{
“$type”: “Sitecore.Commerce.Core.PolicySetPolicy, Sitecore.Commerce.Core”,
“PolicySetId”: “Entity-PolicySet-SitecoreCatalogIndexingPolicySet”
},
sxcupgrade07
I have added that policy type to these files:
  • C:\inetpub\wwwroot\CommerceAuthoring_Sc9\wwwroot\data\Environments\PlugIn.Habitat.CommerceAuthoring-1.0.0.json
  • C:\inetpub\wwwroot\CommerceAuthoring_Sc9\wwwroot\data\Environments\PlugIn.Habitat.CommerceShops-1.0.0.json
  • C:\inetpub\wwwroot\CommerceMinions_Sc9\wwwroot\data\Environments\PlugIn.Habitat.CommerceAuthoring-1.0.0.json
  • C:\inetpub\wwwroot\CommerceMinions_Sc9\wwwroot\data\Environments\PlugIn.Habitat.CommerceShops-1.0.0.json
  • C:\inetpub\wwwroot\CommerceOps_Sc9\wwwroot\data\Environments\PlugIn.Habitat.CommerceAuthoring-1.0.0.json
  • C:\inetpub\wwwroot\CommerceOps_Sc9\wwwroot\data\Environments\PlugIn.Habitat.CommerceShops-1.0.0.json
  • C:\inetpub\wwwroot\CommerceShops_Sc9\wwwroot\data\Environments\PlugIn.Habitat.CommerceAuthoring-1.0.0.json
  • C:\inetpub\wwwroot\CommerceShops_Sc9\wwwroot\data\Environments\PlugIn.Habitat.CommerceShops-1.0.0.json
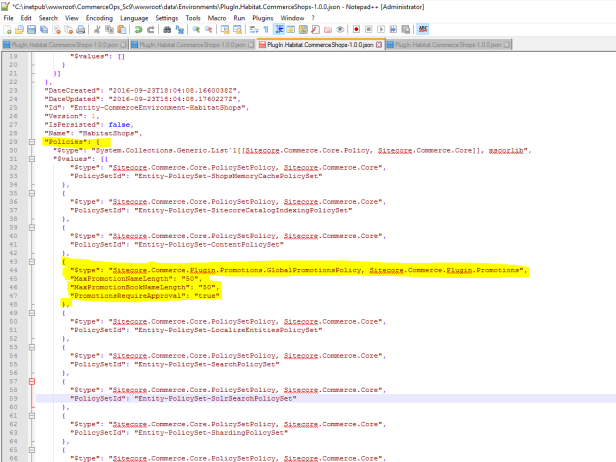
– Add the following policy to the policy collection for all Shops environments:
{
“$type”: “Sitecore.Commerce.Plugin.Promotions.GlobalPromotionsPolicy, Sitecore.Commerce.Plugin.Promotions”,
“MaxPromotionNameLength”: “50”,
“MaxPromotionBookNameLength”: “50”,
“PromotionsRequireApproval”: “true”
},
sxcupgrade08

I have added that policy type to these files:

  • C:\inetpub\wwwroot\CommerceAuthoring_Sc9\wwwroot\data\Environments\PlugIn.Habitat.CommerceShops-1.0.0.json
  • C:\inetpub\wwwroot\CommerceMinions_Sc9\wwwroot\data\Environments\PlugIn.Habitat.CommerceShops-1.0.0.json
  • C:\inetpub\wwwroot\CommerceOps_Sc9\wwwroot\data\Environments\PlugIn.Habitat.CommerceShops-1.0.0.json
  • C:\inetpub\wwwroot\CommerceShops_Sc9\wwwroot\data\Environments\PlugIn.Habitat.CommerceShops-1.0.0.json
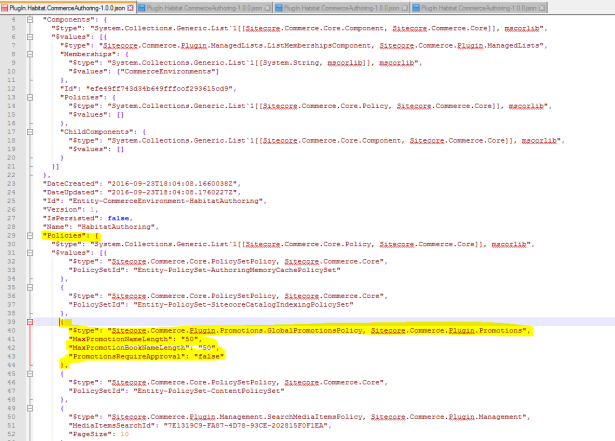
– Add the following policy to the policy collection for all Authoring environments:
{
“$type”: “Sitecore.Commerce.Plugin.Promotions.GlobalPromotionsPolicy, Sitecore.Commerce.Plugin.Promotions”,
“MaxPromotionNameLength”: “50”,
“MaxPromotionBookNameLength”: “50”,
“PromotionsRequireApproval”: “false”
},
sxcupgrade09

I have added that policy type to these files:

  • C:\inetpub\wwwroot\CommerceAuthoring_Sc9\wwwroot\data\Environments\PlugIn.Habitat.CommerceAuthoring-1.0.0.json
  • C:\inetpub\wwwroot\CommerceMinions_Sc9\wwwroot\data\Environments\PlugIn.Habitat.CommerceAuthoring-1.0.0.json
  • C:\inetpub\wwwroot\CommerceOps_Sc9\wwwroot\data\Environments\PlugIn.Habitat.CommerceAuthoring-1.0.0.json
  • C:\inetpub\wwwroot\CommerceShops_Sc9\wwwroot\data\Environments\PlugIn.Habitat.CommerceAuthoring-1.0.0.json
As an alternative, copy the Adventureworks/Habitat Authoring/Shops json files from the 9.0 Update-1server to the 9.0 Initial server, then replace the old servername with the new servername.
You can also use WinMerge to compare old and new files and just copy what is necessary.
1d) Disable Anti forgery
In file “C:\wwwroot\CommerceAuthoring_Sc9\wwwroot\config.json” temporarily set “AntiForgeryEnabled”: false
sxcupgrade10
1e) Start all 4 Commerce sites
sxcupgrade11
1f) Bootstrap using postman

If you haven’t imported any SXC specific collections into Postman until now, then read my blog posts about adding Postman collections specific for SXC 9.

Before you continue, setup authorizing requests in Postman. Follow my blog post about authorizing requests in Postman for Sitecore Experience Commerce 9 and you are good to go.

Now continue in “Collections” pane and open “SitecoreCommerce_DevOps” collection. Expand “1 Environment Bootstrap” section and click “Bootstrap Sitecore Commerce”.
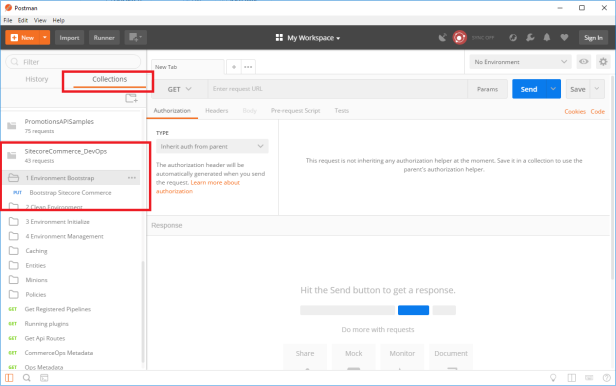
sxcupgrade14.png

As you have set authorization token before, you can click on blue “Send” button.

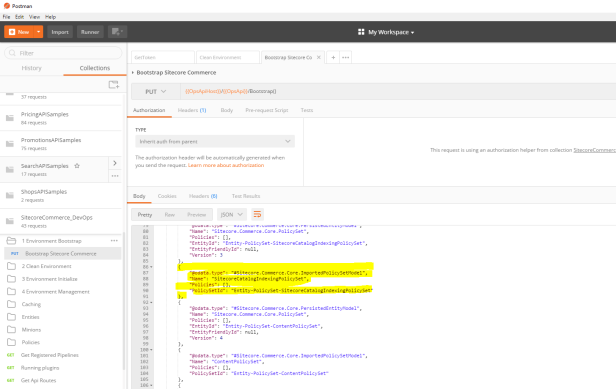
If everything is alright, you will see json with list of policies and other models in response:
sxcupgrade19

 Mind the newly added policies from step 1c)
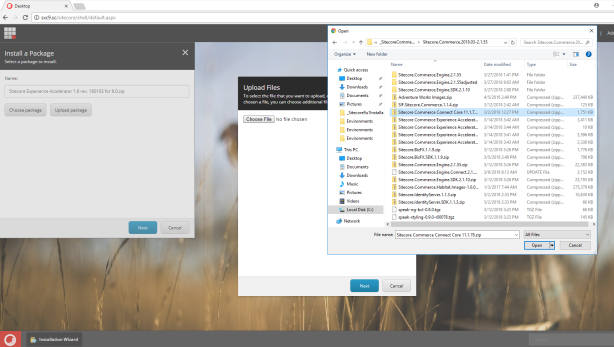
1g) Install updated Commerce Connect Core package
sxcupgrade20
Using the Sitecore Installation Wizard, Install Sitecore Commerce Connect Core 11.1.* package choosing ‘Overwrite’ for all files
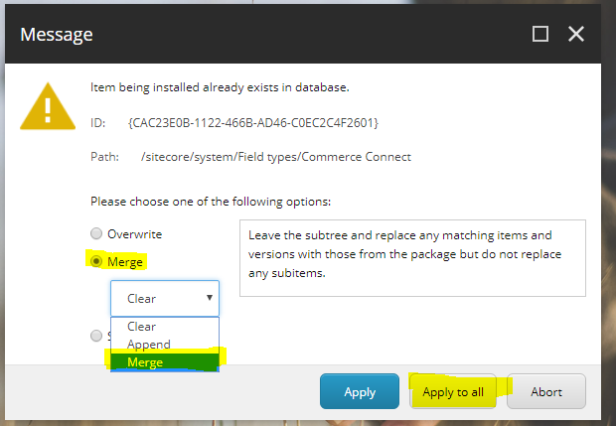
sxcupgrade21
and at the next step choose ‘Merge’ radio button, and ‘Merge’ in the dropdown for all sitecore items.
sxcupgrade22
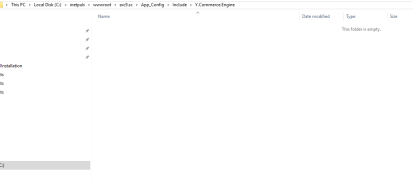
1h) Deleting Y.Commerce.Engine
Note any changes you may have made to your configuration, then Delete all files under
C:\inetpub\wwwroot\<siteName>\App_Config\Include\Y.Commerce.Engine.
Best is to move them somewhere else (to some temp folder) if you haven’t done backup as I suggested in the beginning of this article!
sxcupgrade23.png
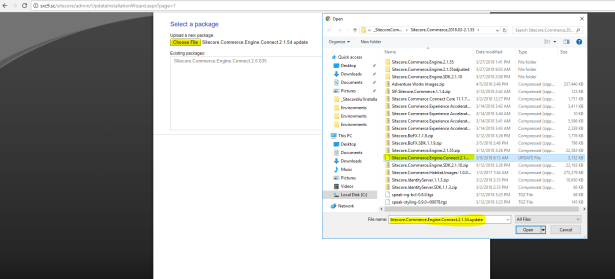
1i) Install updated Sitecore Commerce Engine Connect package
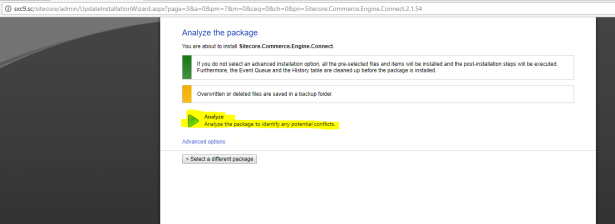
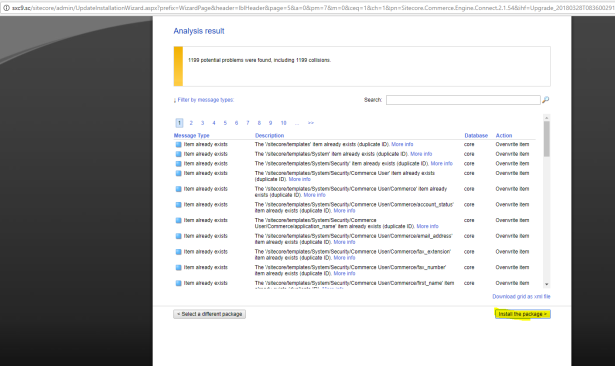
Go to /sitecore/admin/UpdateInstallationWizard.aspx, choose package, then Analyze and Install the Sitecore.Commerce.Engine.Connect 2.1.*.update module
sxcupgrade24.png
sxcupgrade25
sxcupgrade26
1j) Update the new Sitecore.Commerce.Engine.Connect.config
Update the new Sitecore.Commerce.Engine.Connect.config under
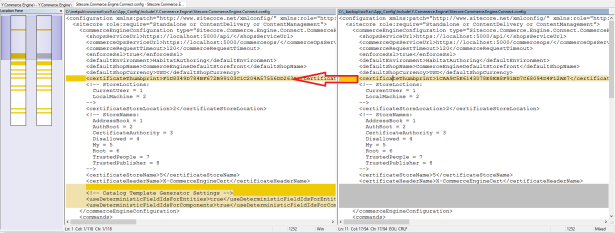
C:\inetpub\wwwroot\<siteName>\App_Config\Include\Y.Commerce.Engine with any configuration updates to ensure the correct URL and thumbprints are being used for connectivity from Sitecore to the Engine.
I have used my backup to compare thumbprints with WinMerge. You can use temp folder where you have moved config files in step 1h).
sxcupgrade27
1k) Clean master and web SOLR cores
If using SOLR, clean master and web SOLR cores by navigating to the below URLs in the browser.
Replace <sitename> with your site name.
For master index:
/solr/<sitename>_master_index/update?stream.body=<delete><query>*:*</query></delete>&commit=true
For web index:
/solr/<sitename>_web_index/update?stream.body=<delete><query>*:*</query></delete>&commit=true
In my case these were the urls:
You should see this kind of response:
sxcupgrade28
1l) Delete data templates
Login to Sitecore and start Content Editor, then click on the Commerce tab.
Execute:
Delete Data Templates
sxcupgrade29
Execute:
Update Data Templates
sxcupgrade30
1m) Reenable Y.Commerce.Engine config files
In File Explorer, go to:
C:\inetpub\wwwroot\<siteName>\App_Config\Include\Y.Commerce.Engine
Rename/enable:
Sitecore.Commerce.Engine.DataProvider.config
Sitecore.Commerce.Engine.Connectors.Index.Common.config
All Sitecore.Commerce.Engine.Connectors.Index.Solr.*.config
(or all Sitecore.Commerce.Engine.Connectors.Index.Azure.*.config if using Azure)
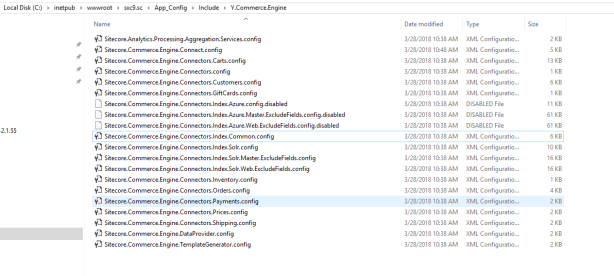
Basicaly remove “.disabled” from file name for above mentioned files.
You should end up like this if you are using Solr:
sxcupgrade31.png
1n) Copy models
Copy the file “C:\inetpub\wwwroot\<siteName>\XConnectModels\Sitecore.Commerce.Connect.XConnect.Models.json”
and paste it into two locations and overwrite / replace:
  1. C:\inetpub\wwwroot\<siteName>.xconnect\App_data\jobs\continuous\IndexWorker\App_data\Models
  2. C:\inetpub\wwwroot\<siteName>.xconnect\App_data\Models
1o) Perform an IISreset
1p) Republish and rebuild indexes
  1. Login to Sitecore again.
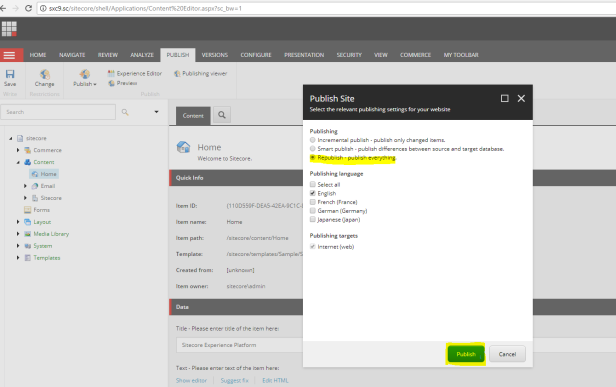
  2. Republish to Web. sxcupgrade32.png
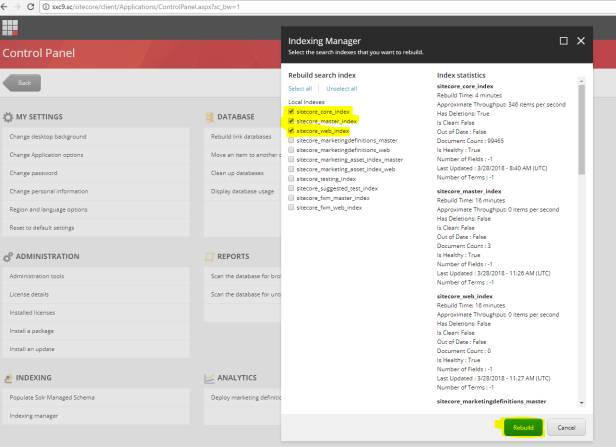
  3. Rebuild Core, Master and Web indexes sxcupgrade33.png
1r) Enable Anti forgery
In file “C:\wwwroot\CommerceAuthoring_Sc9\wwwroot\config.json” revert the temporary false setting back to “AntiForgeryEnabled”: true

Step 2: Upgrade BizFx

2a)
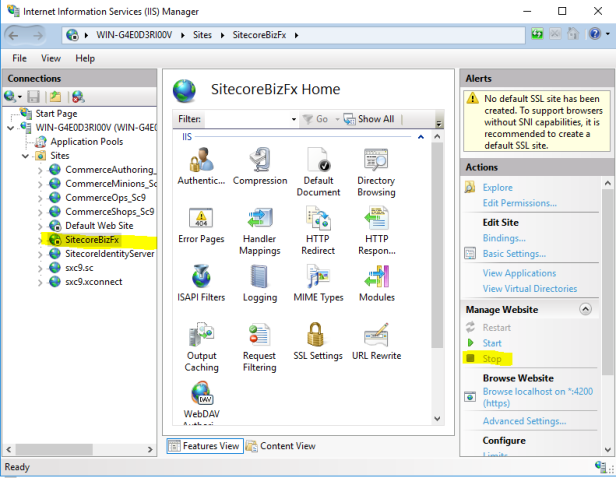
Stop the SitecoreBizFx site.sxcupgrade36.png
2b)
Go to “C:\inetpub\wwwroot\SitecoreBizFx” and document any changes to \assets\config.json.
I just renamed the file to config.json.backup
2c)
Delete then replace all XC9.0 Initial files under “C:\inetpub\wwwroot\SitecoreBizFx
with their 9.0 Update-1 versions, using one of:
  • Sitecore.BizFx.*.zip
  • compiled versions from the Sitecore.BizFx.SDK

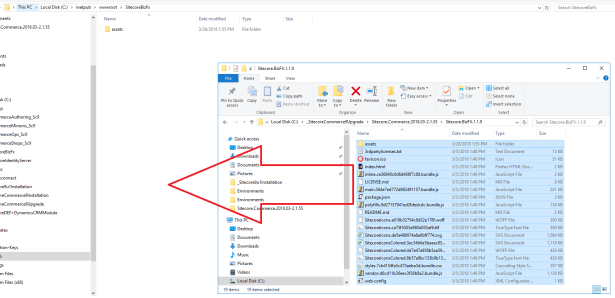
I have used the first option and just copied files from unpacked zip file to site folder:
sxcupgrade34.png

2d)
Update any configuration changes.
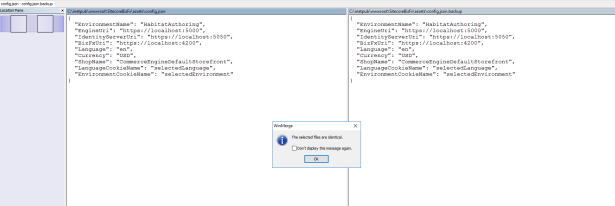
I have used WinMerge and compared config.json.backup with newly copied config.json under /assets/ folder. No changes actually were needed.
sxcupgrade35.png
2e)
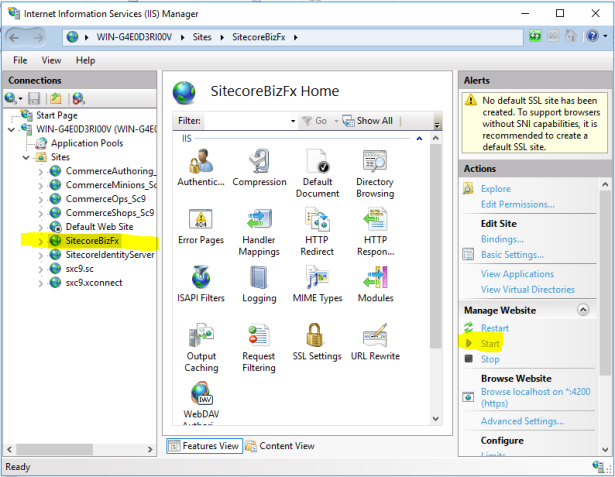
Restart the SitecoreBizFX sitesxcupgrade37.png


Step 3: Upgrading Identity Server

3a)
Stop the Identity Server site.sxcupgrade38.png
3b)
Go to the Identity Server under “C:\inetpub\wwwroot\<idsitename>” and document any changes to \wwwroot\appsettings.json.
I just renamed the file to appsettings.json.backup
3c)
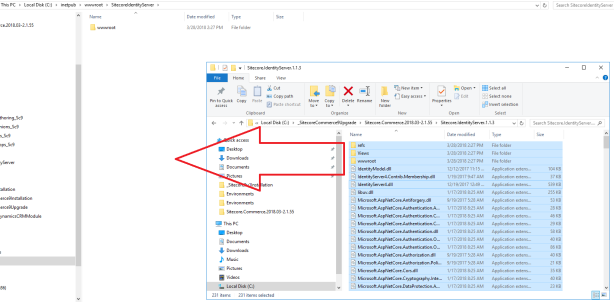
Go to the Identity Server under “C:\inetpub\wwwroot\<idsitename>” and delete then replace all XC 9.0 Initial files in the “C:\inetpub\wwwroot<idsitename> folder only with their 9.0 Update-1 versions, using one of:
  • Sitecore.IdentityServer.*.zip
  • compiled versions from the Sitecore.IdentityServer.SDK

I have used the first option and just copied files from unpacked zip file to site folder:
sxcupgrade39.png

3d)
Update any configuration changes.
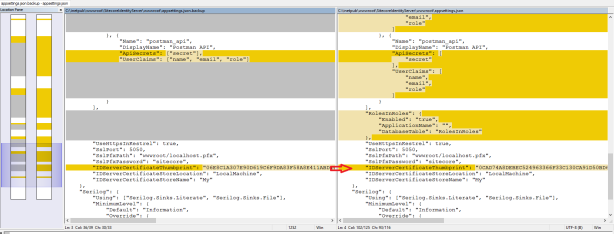
I have used WinMerge and compared appsettings.json.backup with newly copied appsettings.json under /wwwroot/ folder.
I had to push two changes from backup to new config:
  1. ConnectionStringsxcupgrade41
  2. IDServerCertificateThumbprintsxcupgrade40.png
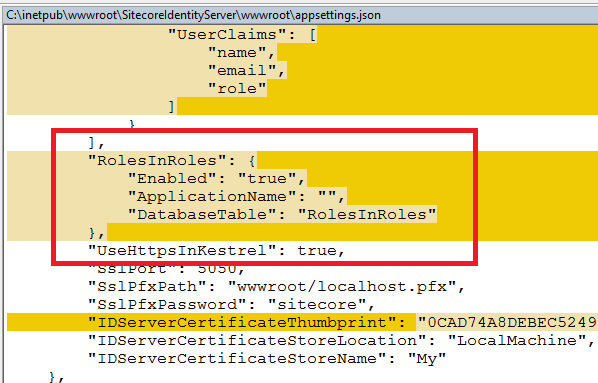
Include additional configuration to “C:\inetpub\wwwroot\<idsitename>\wwwroot\appsettings.json” under “AppSettings”.
“RolesInRoles”: {
“Enabled”: “true”,
“ApplicationName”: “”,
“DatabaseTable”: “RolesInRoles”
},
As I pushed config from package this was not necessary as “appsettings.json” file already had this setting:
sxcupgrade42
3d)
Restart the Identity Server site.sxcupgrade43.png


Step 4: Deploying Storefront

Note: When the 9.0 Update-1 Storefront is deployed on the upgraded solution (steps above), the Storefront does not change or upgrade existing sites. Only new sites built with the 9.0 Update-1 Storefront will have access to the new content.
4a)
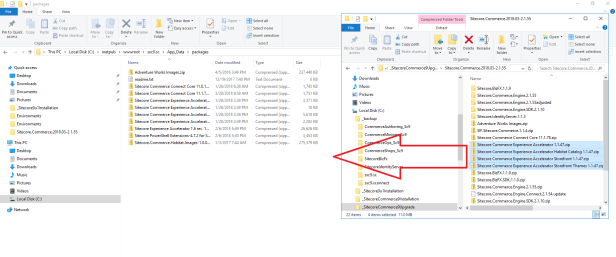
Copy the four 9.0 Update-1 Storefront packages to “C:\inetpub\wwwroot\<siteName>\App_Data\packages”:
  • Sitecore Commerce Experience Accelerator
  • Sitecore Commerce Experience Accelerator Storefront
  • Sitecore Commerce Experience Accelerator Storefront Themes
  • Sitecore Commerce Experience Accelerator Habitat Catalog
sxcupgrade44.png

4b)
Login to Sitecore and start Control Panel, then click on ‘Install a package’ under Administration
4c)
For each of the four Storefront packages:
select ‘Choose package’, and select a package to install select Open, select ‘Next’, select ‘Install’.
If an error is displayed, “Item being installed already exists in database”, then select ‘Yes to all’ to overwrite the files:
sxcupgrade46.png
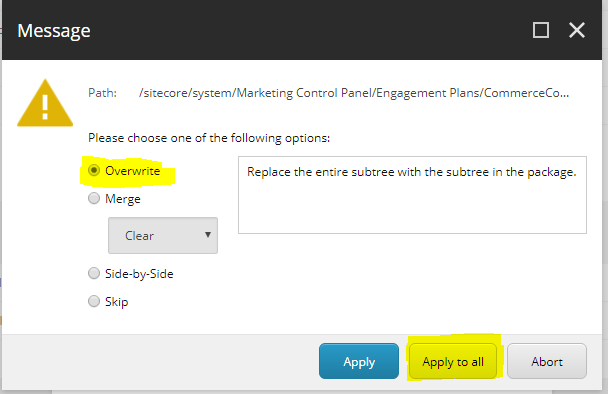
Select the ‘Overwrite’ radio button and then ‘Apply to all’:
sxcupgrade45.png
4d)
Perform an IISreset.
4e)
Login to Sitecore again. Republish to Web. Rebuild Core, Master and Web indexes.
See step 1p) and follow it.
4f)
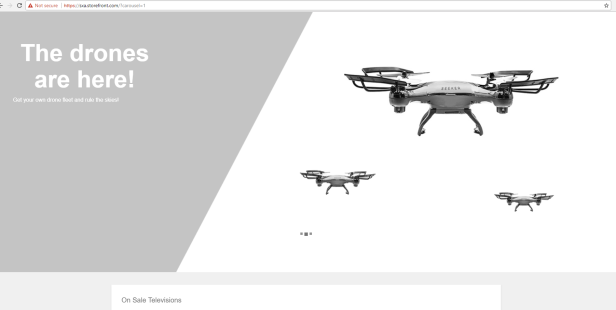
Start your 9.0 Update-1 Storefront site and confirm that your upgrade completed successfully:
sxcupgrade48.png
4g)
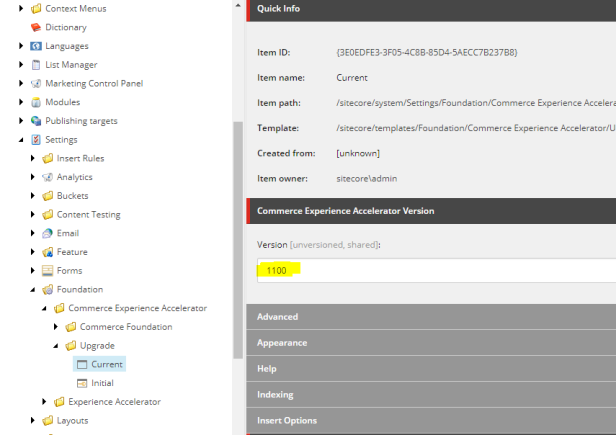
Login to Sitecore and start Content Editor, then go to /sitecore/system/Settings/Foundation/Commerce Experience Accelerator/Upgrade/Current.
Verify the version, it should be 1100:
sxcupgrade47.png


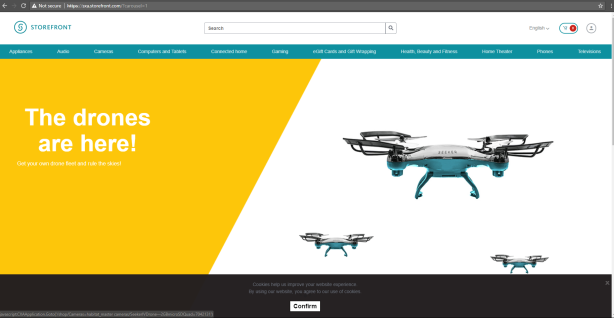
As a bonus you can change default theme to Storefront Branded if you haven’t done so until now. Just follow my blog post and your SXA storefront will look like this instead of that grey default look and feel:
sxcbranded.png


Exciting and successful upgrade 🙂

——————————————————
Used sources: