

As part of our latest prototype, we used latest version of Dynamics 365 connector for Sitecore.
I have used all previous versions 1.0 – 1.4 of this connector when its name was CRM Connect. I have also done some upgrades between versions and my experience was quite good. Especially with version 1.4 where performance was really boosted.
This module has been renamed to Sitecore Connect for Microsoft Dynamics 365 for Sales recently.
Its latest version 2.0.1 requires Sitecore Experience Platform 9.0.1 / Sitecore 9 Update 1 (or greater).
1)
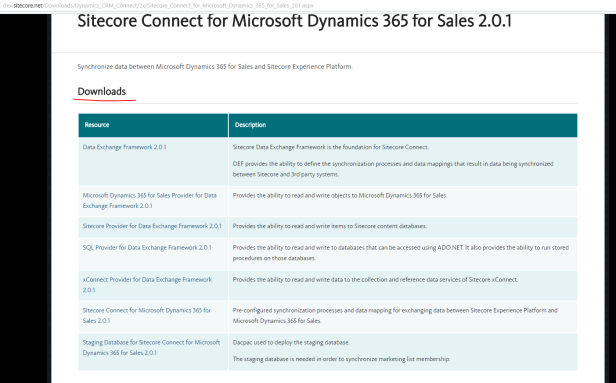
Download required files:
– Download all Sitecore packages from Downloads section on Download page
– Download installation guide
2)
Sitecore 9.0.1 instance
If you already don’t have instance of Sitecore 9.0.1, you can follow my series of blog posts to help you out with this prerequisites before installing Sitecore Connect for Microsoft Dynamics 365 for Sales module.
3)
Install download packages in particular order on newly created Sitecore instance:
a) Install Data Exchange Framework 2.0.1.
b) Install SQL Provider for Data Exchange Framework 2.0.1.
c) Install Sitecore Provider for Data Exchange Framework 2.0.1.
d) Install xConnect Provider for Data Exchange Framework 2.0.1.
e) Install Dynamics Provider for Data Exchange Framework 2.0.1.
f) Install Connect for Microsoft Dynamics 2.0.1
4)
Open web.config in this instance and find section “configuration > runtime > assemblyBinding”.
Add following at the end of this section:
<dependentAssembly>
<assemblyIdentity name=”Microsoft.Xrm.Sdk” publicKeyToken=”31bf3856ad364e35″
culture=”neutral” />
<bindingRedirect oldVersion=”0.0.0.0-8.0.0.0″ newVersion=”8.0.0.0″ />
</dependentAssembly>
<dependentAssembly>
<assemblyIdentity name=”Microsoft.Crm.Sdk.Proxy” publicKeyToken=”31bf3856ad364e35″
culture=”neutral” />
<bindingRedirect oldVersion=”0.0.0.0-8.0.0.0″ newVersion=”8.0.0.0″ />
</dependentAssembly>
Save web.config to apply changes.
5)
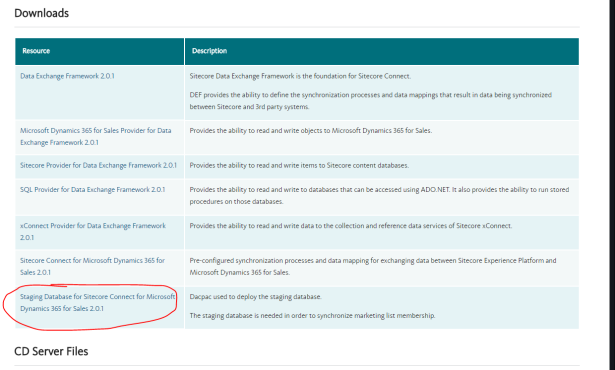
Install Staging Database
In order to synchronize marketing list membership from Microsoft Dynamics as efficiently as possible, the staging database is used. This is a database that is used for temporary storage during the synchronization process.
Steps:
a) Deploy the dacpac Sitecore.DataExchange.Staging.dacpac to your SQL Server instance. This will create the staging database.
Change the name of the database before deploying it to match prefix of your sitecore instance. I usually name this database as {SitecoreInstanceName}_DataExchange.Staging e.g. sc9u1_DataExchange.Staging.
Following this will help you identify which databases are corresponding to which Sitecore instance when you have more instances on one machine.
b) On your Sitecore server, add a connection string for the staging database. Name the connection string “Sitecore.DataExchange.Staging”.
You can also use your “sa” account in local dev environment.
6)
Deploy xConnect Collection Model
a) In Sitecore, open Content Editor.
b) Navigate to sitecore > system > Settings > Data Exchange > Providers > xConnect > Collection Models > Connect for Dynamics > Connect for Dynamics Collection Model
c) In the ribbon, click Convert Model to JSON
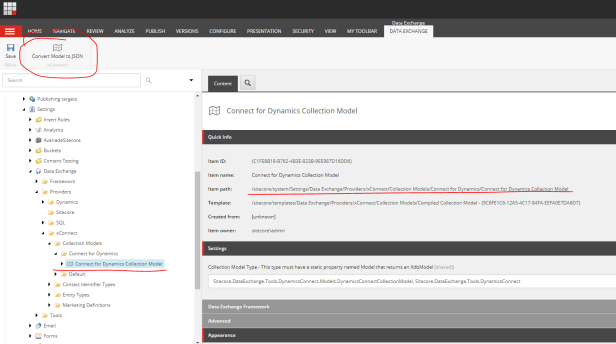
d) Your browser will download a JSON file. Save this file to your local machine.
e) Deploy the JSON file to your xConnect server.
– Copy JSON file into this location – C:\inetpub\wwwroot\{SitecoreInstanceName}.xconnect\App_data\Models
f) Deploy the JSON file to your xConnect indexing server.
– Copy JSON file into this location – C:\inetpub\wwwroot\{SitecoreInstanceName}.xconnect\App_data\jobs\continuous\IndexWorker\App_data\Models
Restart the machine in order to apply changes.
Congratulations! You should have now Sitecore with Dynamics module up and running…
Cheers!
